
These easy to make drawstring bags can be sewn in a variety of sizes, and are unlined which really cuts down the time it takes to make them. They don't use a lot of fabric and the smaller sizes could be used as scrap busters.
I made the bags in the following sizes -
- Pink Sorbet - 16cm x 18cm
- Lemon Fizz - 18cm x 23cm
- Goody Gumdrop - 27cm x 32cm
- Bubblegum Blue - 39cm x 48cm
Materials needed
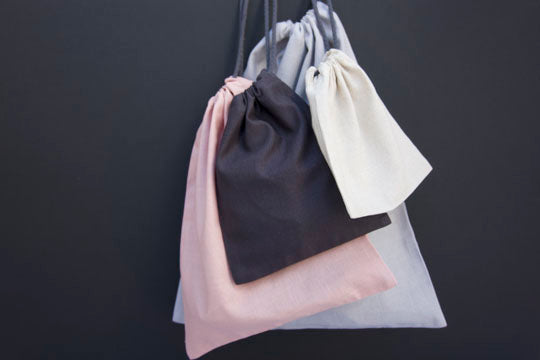
Fabric - I used our range of sorbet coloured Crossweave Linen that comes in Pink Sorbet, Bubblegum Blue, Goody Gumdrop and Lemon Fizz. This is a crisp linen, that really softens while you use it and will soften even more when washed.

Elastic or Cord - Two pieces of elastic or cord.
If using elastic: Each piece will need to measure 2 x width of the bag, plus an extra 25cm.
If using cord: Each piece will need to measure 2 x width of the bag, plus an extra 40cm. (The elastic gives you extra stretch, which you won't get with the cord)
A small amount of iron on woven interfacing. I used white as the linen is quite transparent.
Labels - I used the Rainbow Mini Hands to decorate the side seam
Prepare and Cut your Fabric
Measuring and Cutting
Decide the size of your bag, then add the seam allowances. Add 5cm to the top of the fabric for the elastic casing and 1.5cm to the other three sides.
For example, for the largest of the bags is 39cm x 48cm, The fabric needs to be 42cm x 54.5cm.
It may be helpful to make a paper pattern first and then use that to cut the fabric out accurately. Remember to keep the grainline straight on the fabric. If you use a pattern, use the edge as the grainline marker.
Cut the fabric out to the size that you have decided. You need two rectangles of the same sized fabric.
Press the Elastic Casing
Press the top of the fabric over by 2cm and then 3cm with an iron. These folds will mark where the casing will be and help you determine where you need to place your buttonhole for the elastic to thread through. Sewing down the casing will be the last step.

Buttonholes
The elastic will pass through the buttonholes in to the elastic casing. To make the buttonholes, mark 2.5cm in from each side edge (longest side) and 0.5cm from the second fold of the casing that you have just pressed. Use iron on interfacing to give the buttonholes stability. There will be four buttonholes in total. Use your sewing machine to create a buttonhole that is large enough for the elastic to thread through. Make sure that it isn’t any longer than the height of the casing (3cm). I recommend testing your button holes before you do it on the bag.
Sew the Side Seams
I finished these seams with a french seam, which is my favourite finish and perfect for these bags. You can also choose to finish your seams with an overlocker or with a zig zag stitch if you prefer.
How to sew French Seams
To sew a French seam, place the fabric WRONG SIDES TOGETHER. Pin all the sides and start from the top (where the entrance to the bag will be) and with a 0.5cm seam allowance sew the three sides. Leaving the top of the bag open (where the folds are) Press the seams and trim. I do this to remove any edges that may have frayed to make it easier to sew.
  Turn the bag so the RIGHT sides are together. Press the seams, so you have a nice crisp edge.
Insert Label
Place the label where you would like it in the outer seam. Pin in place to make sure it doesn’t move.

Start in the same place that you did for the first line of stitching. With a 1cm seam allowance sew the same three sides. Press again.
The body of the bag is now done! Next up is the casing for the elastic and you are almost there!
Elastic Casing
You may want to re-press the top as it might not be as defined as it was to begin with.
Fold it down towards the inside, pin in place and sew it down. I used the top of the bag as a guide to ensure the stitching was parallel to the top of the bag.
Take one piece of measured elastic (as per measurements outlined at the beginning of the tutorial)
Using a bodkin (or a safety pin) thread the elastic through one buttonhole and into the casing. Feed it along the casing so that it comes out the buttonhole on the opposite side of the bag. Insert the elastic back into the casing on the back side of the bag, keep feeding the elastic through so it goes around the whole bag.


 Sew each elastic down on the seam line next to the reef knot so it doesn’t become exposed when the drawstrings are pulled.
 I have used two drawstrings as it makes it easier to pull it shut, but you may prefer just one string.
  And your bag is made!
SAVE IT FOR LATER...