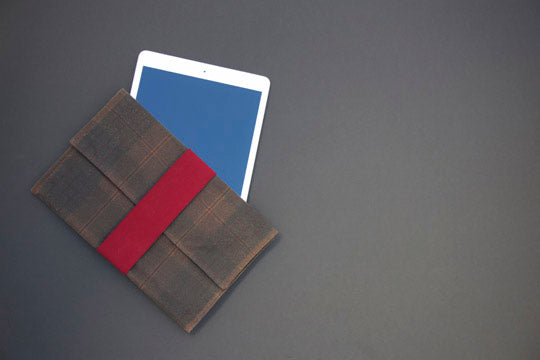

This slimline tablet cover is a quick, stylish and customisable project that will bring a little handmade sensibility to your technological world. With just one Fat 1/4 of a cotton canvas, quilting cotton or mid weight linen, plus a scrap of quilt batting or an old woollen blanket, and a little elastic, you can whip up a gorgeous new cover for your tablet - or easily customise the size to make a cover for your kindle, phone or laptop....
The wide elastic band holds the cover together securely, while still allowing quick and easy access to your devise. Plus there are no raw edges, magnets, zips, buttons or clips to scratch or interfere with your precious technology,
This tutorial has used the muted Hawthorne Tartan Oilskin and an Organic Cotton Poplin in Mulberry which is a beautiful crimson colour, coordinating beautifully and picking out the mulberry tones of the oilskin. You can make it your own with different coloured elastics with bright, bold colours and prints, or muted earthy tones. Have a look at the Miss Maude collection of 50mm wide elastics for inspiration.
Sizing:
Customisable to suit.
Making this as a gift? Not sure what size to make? Most major brands will have the dimensions of their various tablets and devices available on their websites. Harness the power of the web! For example, here are the current Apple iPad dimensions.

SUGGESTED FABRICS:
This tablet cover was originally designed to be made with the cotton canvas in store, but it would work just as well with any medium weight cotton, linen, denim, or quilting cotton,
YOU WILL NEED:
For a tablet measuring 24cm x 18.5cm you will need:
- 1 x 0.5m of Oilskin or similar (CHECK YOUR MEASUREMENTS) we used Hawthorne Tartan Oilskin
- 1x of lining material we used Organic Cotton Poplin
- 1x 50cm x 23cm piece of Quilt batting (or an old wool blanket)
- 40cm of 50mm wide elastic
- Matching thread (we used Gutermann 368)

CUTTING:
1. Measure and write down the dimensions of your tablet.
2. Cut two rectangles from your main fabric - each rectangle should measure:
the width (shortest side) of your tablet x 2.6 + 2cm for seam allowances x the length (longest side) of your tablet + 5cm.
Note: if you make this for a laptop or other device that is more than 1cm deep, you will need the add two times the depth to the length of your rectangle.
If you have a pattern or stripe on your fabric, you will want to match the pattern along the length of your rectangles.
3. Cut one rectangle from your batting that is the same size of one rectangle from your main fabric.
4. Cut your elastic to length. Length should measure: circumference around the width (shortest side) of your tablet + 2cm seam allowance. It is worth checking the size of your elastic before you sew it to the tablet cover.
Sewing:
Pin the two main fabric, and batting rectangles together. The batting should be on the bottom, with the two main fabric pieces right sides together on top of that. See photos below.

Ensure you match any strips or pattern when you pin.
Sew rectangles together with a 1cm seam allowance. Sew around all edges, but leave a 15cm opening along one short edge.

Trim corners.

Using the opening, turn cover through to the right way. Make sure you push out the corners well to get them as square as possible - a bamboo point turner or similar will help here.
Press, turning under the seam allowance along the opening as you go.

Pin the opening together, and topstitch along this edge. Ensure the topstitching is done with the outer side of the cover facing up. Because I didn't want pin marks in the oilskin I used Fabric Clips to secure the fabric together.


Mark the centre of what will be the outer side of your cover. Pin the elastic to the outer side of your cover, matching the centre point of cover with the seam of your elastic. The wrong side of your elastic should face right side of the fabric. 

Sew elastic to cover, stitching in the ditch of the elastic.
Note: while not shown in photos, it is recommended you also add a row of topstitching on either side of the seam just sewn. This will give extra strength to the elastic band, which will get a lot of stress while in use.
 Turn the cover over, so the inside is facing up. Fold the end that you have already top stitched into the middle of the cover. This makes the pocket for your tablet. The depth of this pocket should be just slightly less that the depth of the flap to the left.
Pin edges. You may also like to slip your tablet in to try it for size. Adjust if necessary.

Top stitch 5mm from the edge. Start at one bottom corner of the pocket and work your way around to the other bottom corner as indicated in the photo below. Again, ensure you stitch with the outer side of the cover facing up.
 Trim thread, flip the elastic over the cover and you are done!


SAVE IT FOR LATER...