Written & sewn by Emma
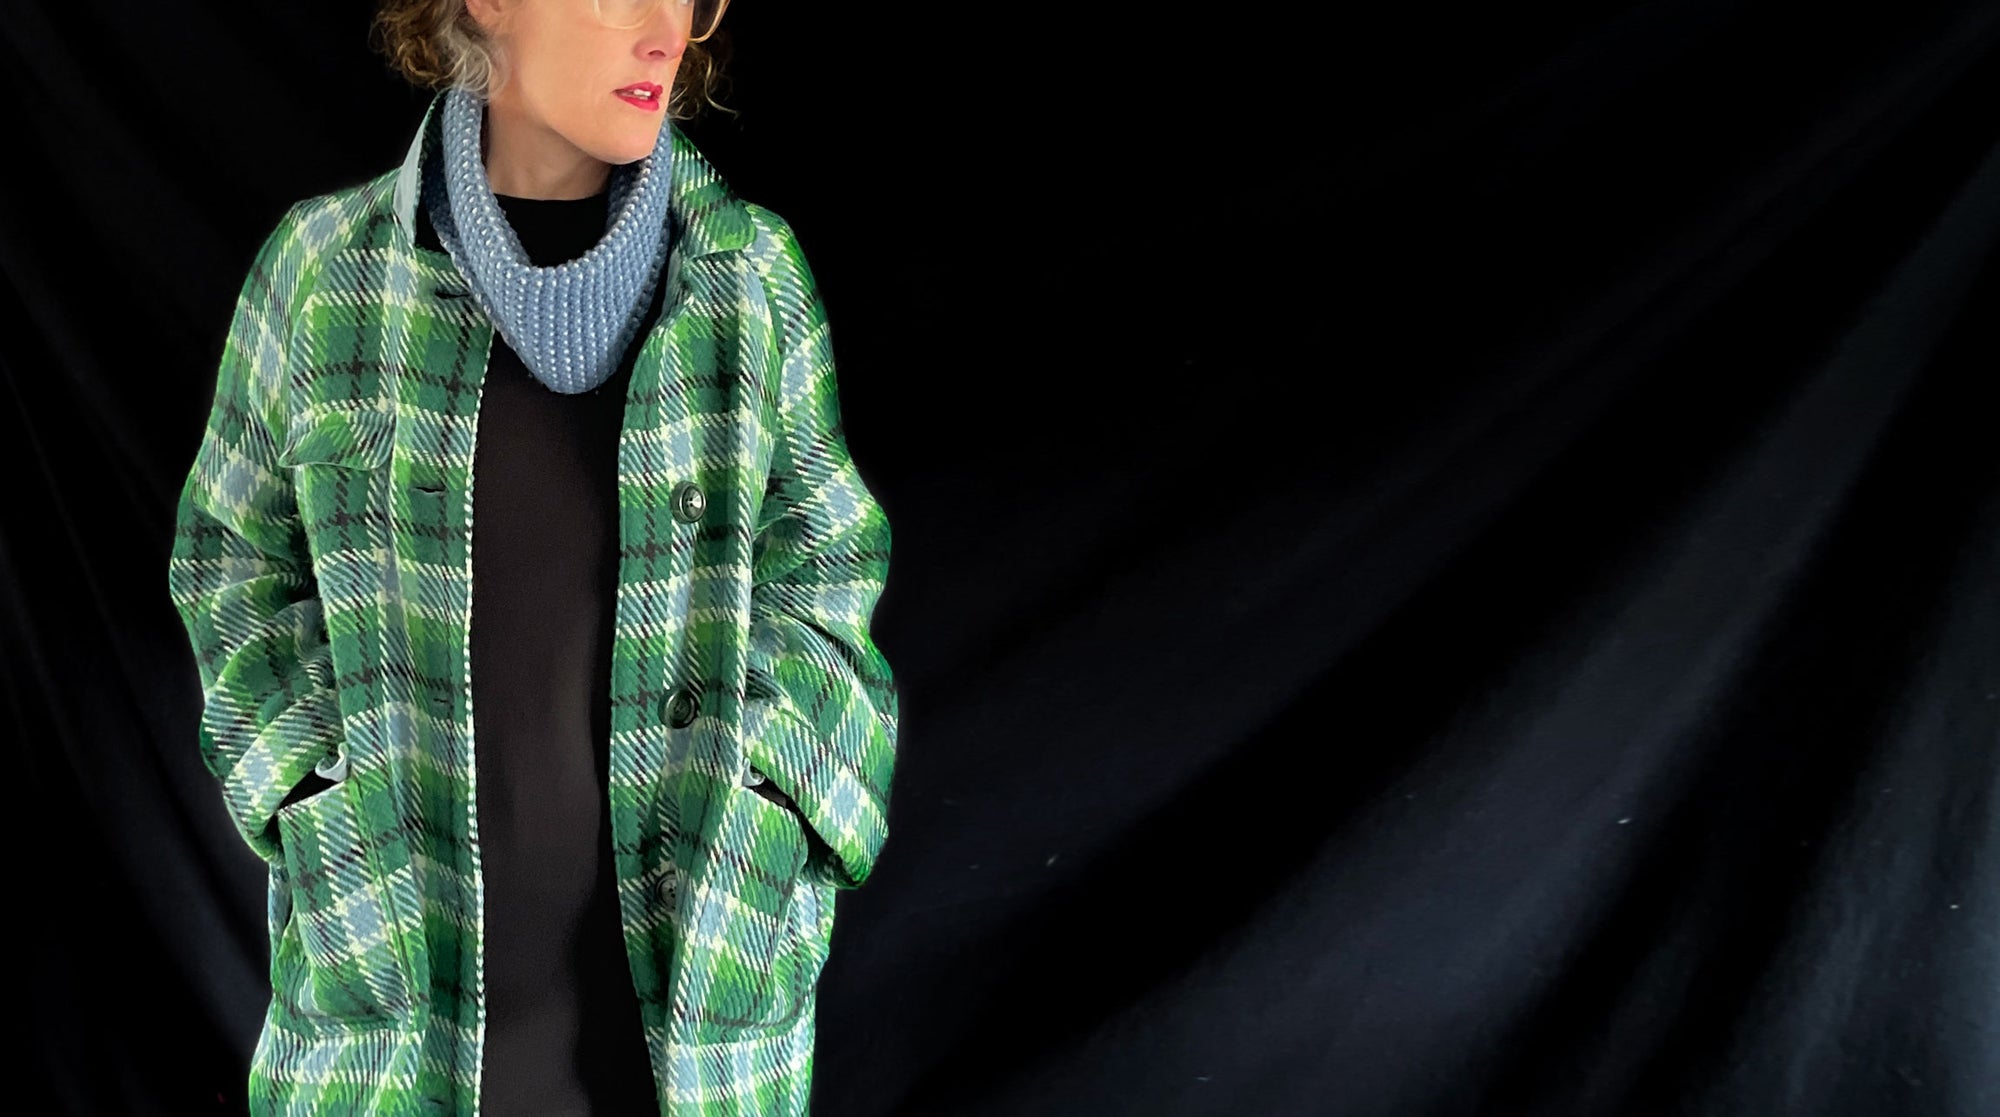
I've had my eye on the September Coat since it was first released - I love the look of a longline coat/duster and as someone who feels the cold, it is also a wonderfully practical wardrobe item for me. 
We recently received a later winter drop of Italian Wool Coatings in the store, and when I laid eyes on the vibrant apple greens and blues of the Valley Check, I immediately cut myself a length for this project. 
Pattern - Merchant & Mills - The September Coat
Size - 12. Made for Emma, her bust measurement is 97cm, Height 173cm
Fabric -
- Valley Check Italian Wool Coating. I used an additional 50cm for pattern matching
- 8 oz organic sanded twill in Adora Blue for pockets, under collar
Notions -
- Dark Green Vintage Coat Buttons, 35mm
- Viscose Crepe Bias Binding in River Blue, 7m
- Mid weight knit interfacing
- Tailor's Clapper
- 80/12 Universal Sewing Machine Needle
- Sew All Thread
Skills Used
- Sewing with heavy fabric
- Topstitching
- Buttonholes
- Hong Kong Seam Finish
- Pattern Matching Checks
- French Seams
- Inserting Pockets
Maker - Emma
REVIEW
Pattern and Instructions
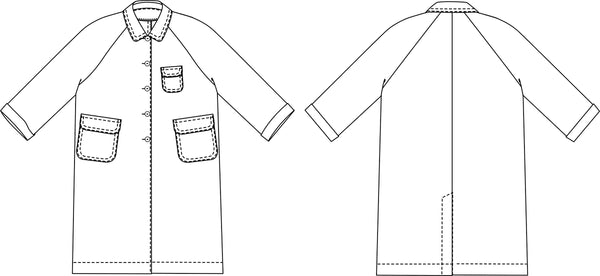
The September Coat is another timeless pattern from the Merchant & Mills pattern range - it has been designed as an oversized, raglan sleeve coat that can be made either with or without a lining. There are detailed instructions for both options included in the pattern.
Personally I was wanting a coat to wear inside while at work, so I opted for the unlined version and used bias binding to finish the seams that may be visible as I saunter amongst the shelves of yarn and bolts of fabrics!
I didn't make any adjustments or alterations to the pattern. I did however alter the construction of the pockets slightly. Explained further below.
I found the pattern to be well drafted and with clear instructions. Everything went together well, and I would happily recommend it to confident intermediate sewers.

Fit & Sizing
I am 173cm tall and my bust measurement is 97cm. Referencing the pattern size chart, this puts me at a size 14.
The pattern is an oversized style, with plenty of ease, but as I wanted something to wear indoors, I didn't want it too big and bulky. I used a ready-to-wear coat of a similar style that I already had in my wardrobe to help choose my size. I made a size 12 with no adjustments and I am really happy with the fit.

I have broad shoulders, so the raglan sleeve is a good style for me - generally a raglan is easier to fit me and is more comfortable. As a bonus, raglan sleeves are normally easier and quicker to sew that a set in sleeve.
In the photos here, I am wearing it over a relatively fitting knit dress. The coat still fits over bulkier jumpers, but I suspect I'll only layer it over dresses and shirts.
Prepping the Fabric
I used a 100% wool fabric and I don't plan to wash the finished coat - I'll spot or dry clean it if needed. But to make sure that I wouldn't get any shrinkage during construction (a lot of hot steam is used to get crisp seams), I pressed my fabric with a hot steam iron before laying out my pattern.
This fabric is woven with relatively thick yarns in a loose-ish twill weave. This results in a warm fabric with a lovely drape, but also a fabric that loves to fray!! This created a bit of a challenge with some of my seams, so if I was to use this fabric again, I would overlock the edges of all pattern pieces immediately after cutting them out. 
I ended up moving this project around a bit - sewing on the dining table, I had to pack up and unpack the work in progress to make way for family life! This meant that some of my pieces frayed more than I would have liked. I ended up having to trim my front facings a little, which resulted in my button holes and buttons not quite being centred at the front. As I intend on wearing this as a duster style, I don't anticipate buttoning the coat up, so in this case it's not a biggie.
Cutting & Layout
The check on this fabric is bold, so I wanted to make sure that I pattern matched the checks where possible. This meant that cutting out the pattern pieces took quite a while. I cut each piece out on a single layer of fabric to make sure that I could align the checks. 
The above photo shows the centre back seam matching across the back, as well as upwards to the collar.
The key to getting a good pattern match is to make sure the pattern hits the same point of the fabric pattern design at key points - such as the hem, notches, underarm, pockets, shoulder, etc. Also, don't forget about the seam allowance - you will 'loose' some of the check pattern in.
As I laid out and cut each piece, I placed the pattern pieces to be sewn together on top of each other to make sure that all the checks matched. (See image below) I also had to remember to cut pairs by flipping each pattern piece that needed a pair to be cut. This is very easy to forget when cutting out pattern pieces on a single layer of fabric! 
I also made sure to mark the right side of each pattern piece with a safety pin. The fabric looks the same on both sides and I didn't want to end up with two left arms!! 
I cut the pocket flaps out on the bias to add a little interest. 
Due to the relatively loose weave of this fabric, it had plenty of 'wobble' when sewing the seams. Because of this, and combined with my desire to pattern match the checks, I made sure to use plenty of pins when aligning seams.
As mentioned - this fabric likes to fray! So I would definitely recommend overlocking the edges of each pattern piece immediately after cutting it out.
Once each seam was sewn, I pressed it using a lot of hot steam and a tailor's clapper. This helps set the seam and creates a permanent crisp seam. 
For the seams that are likely to be visible when wearing the coat, I finished them with a Hong Kong Binding. This included the front and back facings, hem and back vent. 
I French Seamed the side pockets and everything else was overlocked.
Pockets
As the inseam side pockets may be seen when wearing the coat, I decided to French Seam these, and ideally I would have finished the side seams with Hong Kong Binding too, but....well, I ran out of time! There was an icy polar blast forecast and I wanted to finish this in time! 
There are three patch pockets on the front of the coat, I choose to line these with 8oz Sanded Twill to give them a little more rigidity - I tend to give my pockets a work out when working in the store! Phones, rubbish, pens, scissors, tapes, and more end up in there!
To do this, for each patch pocket and pocket flap, I cut one in the main coat fabric and cut one in the Sanded Twill lining. I then sewed each pair together with right sides facing and bagged them out before sewing onto the coat.
Collar
I generally like to wear my collars up, so I'm always a fan of a contrast under collar. For this project I used the Sanded Twill to co-ordinate with the pockets. It has also helped give a little more structure to the collar with this looser weave fabric. 
I cut the Under Collar and one Collar Stand from the Sanded Twill.
Buttons
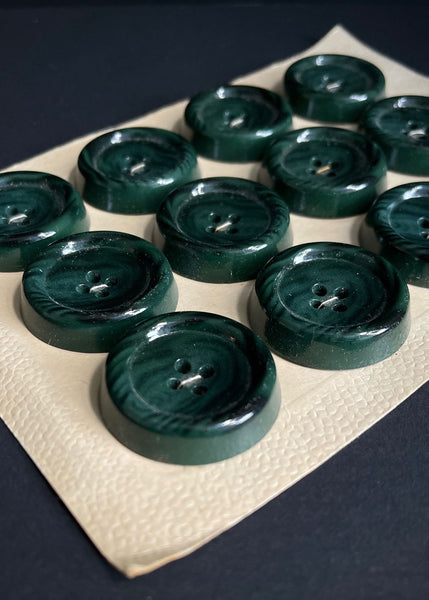
I used some gorgeous 35mm vintage buttons. Before sewing the buttonholes, I reinforced the fabric with a little extra interfacing. This is because of the loose weave of the fabric, and wouldn't be necessary on a tightly woven drill or similar.
I sewed the buttonholes on my machine, but am planning on reinforcing them by hand stitching over the top.

Conclusion
I love this coat! It has a beautiful weight and drape - cozy, but not too bulky to wear throughout the day. I'm also a big fan of the bright colour - it definitely brings a smile on a dreary day.
I am happy with sizing down one size for fit, and have my eye on a few other fabrics in the store to make a few more - time permitting!! It's such a great way to showcase favourite fabrics and is an easy way to zhuzh up a plain outfit.
The coat can be sewn up in anything from a mid weight linen right through to a heavy denim or oilskin. I may or may not have a piece of Oxblood Dry Oilskin and Rolling Downs Cotton Canvas cut off and stashed away for more September Coats! 😉
SAVE IT FOR LATER....