
Knitting is a great hobby, it isn't quick but the satisfaction that you get is never ending!
Before you can wrap yarn around needles and whip up a hat, scarf or a jumper, there is a little bit you need to do to prepare.
Everything you need will be listed in the pattern, and it also gives you a lot of other information too, such as tension, needle size and the type of yarn to use. This may seem like a lot of information to take in - but we're here to break it down to help you create something you can be proud of!
So many Numbers and Abbreviations!
- What does it all mean?
When picking up a knitting pattern for the first time - you might think you're looking at short hand or a foreign language! There can be a lot of numbers and abbreviations, which may at first appear confusing, but once you know what you're looking at - it is actually very straight forward.

Abbreviations > Abbreviations are used to save space on the paper - and once you've knitted a few patterns, you're likely to find that they are quicker and easier to read.
All patterns should have a list of abbreviations that have been used throughout the pattern. While there are common abbreviations that most knitting patterns utilise (such as P = purl, K = knit), we recommend you always refer to the abbreviation list of each pattern before starting.

You are also likely to see abbreviations used for units of measurement - some of these include:
mm = milimetres
cm = centremetres
" or in = inches
yd = yards
m = metres
g = grams
row = a row of knitting that is knit back and forth
rnd = round, a complete circle of knitting when knitting a circular pattern
Numbers and Brackets >
Most garment and accessory knitting patterns will be designed for various sizes. This might be as simple as two sizes in the case of a shawl perhaps, or there might be 10 or more sizes in some garment patterns.
For most patterns, the sizes will be listed in a series of brackets - the brackets simply group the various sizes, and will correlate to information and instructions further on in the pattern. For example in the image below, size L is the third size listed in the first set of brackets and it has a finished circumference of 52" or 132cm.

The brackets/grouping generally makes it easier to read the pattern and to find the information and instructions relevant to your size. In the example above, all measurements and instructions throughout the remainder of the knitting pattern that are required for a Size L will be listed as the 3rd number within the first set of brackets - we can now ignore all the other numbers in the list.
Many patterns are written for both imperial and metric measurements - which makes for a lot of numbers! Just take your time to ensure you are reading the relevant measurements for you.
Pro Tip - once you have determined your size, slowly read through the pattern circling/highlighting the instructions, numbers and measurements that are relevant to your size. You can see I have started to do this with orange marker in the image above.

Note: where the brackets enclose a series of numbers, the unit of measurement will be listed at the end of the set of brackets (as in the image above) This might be length, weight, or a stitch/row measurement
Pattern Repeats
Knitting patterns are just that - a series of repeating patterns. In the simplest form, it is the repeat of one Knit Stitch. More complex combinations of stitches are repeated over and over to create interesting textures and lace details.
A knitting pattern will normally write all the stitches included in a pattern repeat, then tell you to repeat it either a certain number of times, or until you reach a certain point in your row or project.
For example to create a basic rib, for say the border of a hat, the pattern instructions may be:
*K1, P1; rep from * to end.
The * denotes the beginning of the pattern repeat, while the ; is the end of the repeat. So the direction above means to:
Knit one stitch, Purl one stitch, then repeat this pattern until you get to the end of the row. So for this row you would simply alternate knitting then purling each stitch.
You may also encounter a pattern repeat where a number of rows or rounds are repeated multiple times. In this case you will be given the instructions for each unique row/round, then an instruction such as:
Work rounds 1-2 a total of 3 times.
This means you would knit the following:
Round 1
Round 2
Round 1
Round 2
Round 1
Round 2
Selecting your Size

First you will need to identify your size according to the size guide on the pattern - this will in turn determine how much yarn you will need for your project.
When choosing what size to make - some patterns may list Body Measurements, while others may only list the Finished Measurements of the project. If this is the case you need to choose how much ease you desire.
EASE
Each garment is designed to have a certain amount of ease.
Ease is the difference between the body size and the garment size.
For example, the finished garment measurements for a jumper might be;
Finished Bust Measurements: A - 102.5 (B-111.5, C-120, D-129) cm bust circumference
The pattern is designed to be worn with 5-20cm of ease depending on your personal preference. If you like a baggy jumper you might opt for the full 20cm of ease.
Body Measurement + Ease = Finished Garment Measurement
In this case, if your body measurement at the bust is 100cm, add 20cm ease to this and you get 120cm, equating to the size C.
Now you know your size, the next step is to choose the yarn (if you haven't already!)
Yarn Choice

Patterns will specify the type of yarn it has been designed for - perhaps a 4ply, 8ply or a 12 ply etc.
Sometimes a knitting pattern will suggest a specific brand of yarn - but you can choose to use different brands than suggested. In this case - use a yarn that has similar characteristics. Things to look for are:
- yarn weight, ie - 2ply, 4ply, 8ply.
- recommended needle size - this will be written on the yarn label
- tension - this is how many stitches and rows of the knitted yarn that will fit in a 10cm square
- yarn content, ie - fibre used, or if a blend of fibres the ratio or percentage of each fibre.

Once you get more confident with your knitting you'll be able to have fun 'breaking the rules' by using different yarns or yarn combinations to create your own unique knitting projects.
To try to make life a little easier - we list on our website yarns that are suitable for each knitting pattern.
Amount of Yarn Required
The knitting pattern will specify the amount of yarn that is required for each different size.
Pro Tip - We always recommend that you buy all the yarn for your project at the same time. Yarn is dyed in batches and the colour can vary each time a batch is dyed. You want to avoid buying yarn from different batches which may result in striping where you have changed yarn batch colour.
Each yarn (with the exception of some hand dyed yarns) will have a batch number to check on the yarn label.
If you are using the same yarn as specified in the pattern - it should tell you how many balls or skeins that you need. If choosing to use an alternate yarn, you will need to do a couple of easy calculations.
A pattern will tell you how much yarn you need in one or all of the following:
- grams
- metres
- yards
Where metres or yards are given - simply divide the total length of yarn needed by the length in each ball or skein of your chosen yarn.
Balls/Skeins Required = Total length required / Length in Each ball
The yarn label will tell you how many metres/yards there are in each ball/skein
For example a pattern calls for 1082 (1233, 1358, 1509) meters
If we want to make the first size - and we've selected a yarn that has 400m in each skein, we'll need:
1082m / 400m = 2.7 skeins. In this case, we'd purchase 3 skeins.
Pro Tips -
> Always round up to ensure you have enough for your project.
> Use the same measurement unit throughout your equation - yards or metres.
Where grams are given, and you are using a different yarn than specified in the pattern:
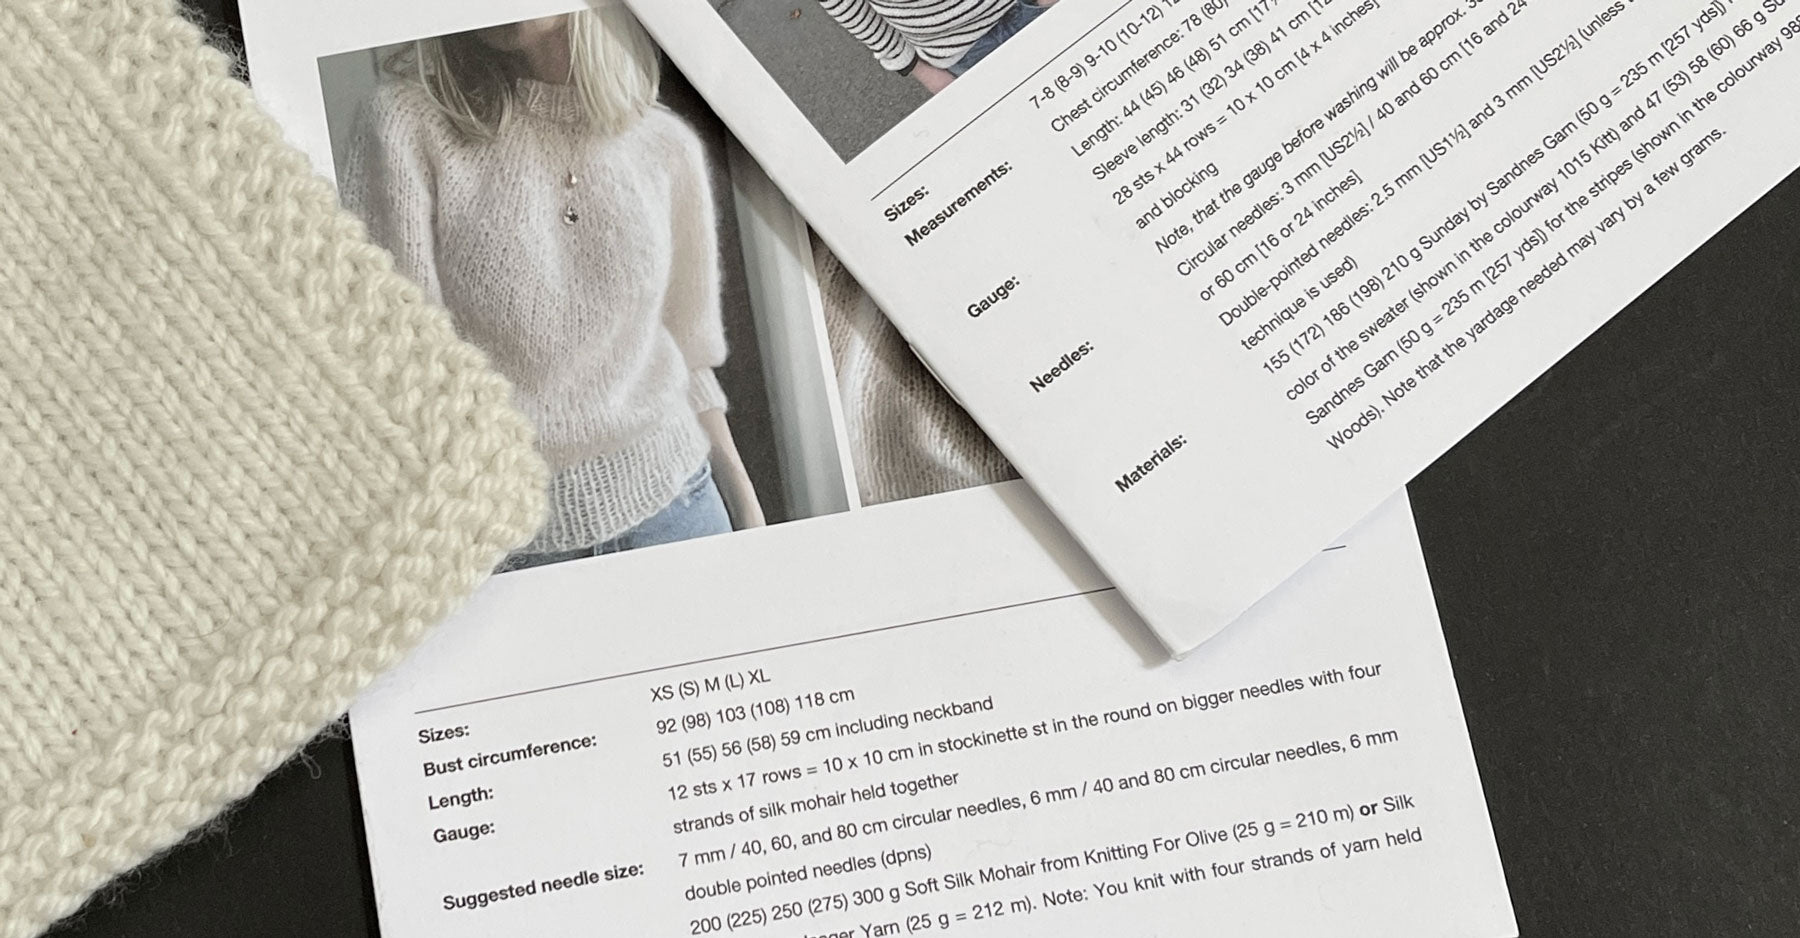
The knit pattern designer will specify grams of yarn required, plus they should state how many metres or yards are in each 50g or 100g lot. See image below for an example.
In this case we need to work out how many metres (or yards) this equates to. To do this we use the following equation:
(Weight required / Weight of ball specified) x Length of each ball specified
So in the example above if we are to knit size XS (the first size listed) our equation looks like this:
(200g / 25g) x 210m = 1680m
Now that we know how many metres we need, we can use the first equation above to determine how many balls/skeins to buy of our chosen yarn.
Note: Yarn requirements are always approximations - actual yarn used may vary based on your knitting style and variances in different yarns.
Needle Size + Gauge

The next step is to determine the needle size you will use.
The pattern will give you an indication of what they suggest as a needle size but this will also depend on if you are a loose or tight knitter. This is why knitting a tension square to check gauge is very important.
Getting the right tension and needle is very important for a project where size matters (ie a jumper). 1cm difference may not seem much on a 10cm square but over the width of a jumper it can have a real impact!

For example the pattern will state that the gauge needs to be:
21 stitches x 32 rows = 10cm in stockinette stitch on 4mm needles after washing and blocking.
If you have less stitches and rows in your 10cm x 10cm square than specified in the pattern, then try using a smaller needle and testing again until you find the right needle size for your style of knitting.
If you have more stitches and rows in your 10cm x 10cm square than specified in the pattern, then try using a bigger needle and testing again until you find the right needle size for your style of knitting.
Pro Tip - knit your tension square a few cms larger. We normally recommend 15cm x 15cm. This is because your edge stitches and rows can sometimes be a little off gauge. Measure your stitches in the middle of your tension square. See image above.
Feeling inspired and ready to start knitting? Take a look at our beginner knitting patterns here.
Happy Knitting!
SAVE IT FOR LATER....