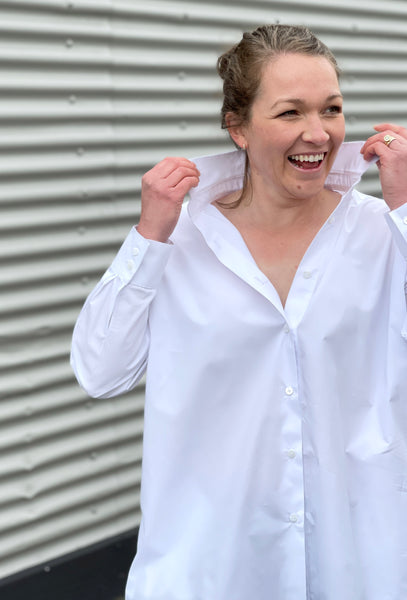
Collars can be finished in lots of different ways and come in many different shapes and sizes, they are the standout detail when sewing a shirt. For the purposes of these sewing tips we have used The Assembly Line Oversized Shirt as the base to help illustrate some of our points.
The Assembly Line Oversized Shirt gives two options for shirt collars. A Collar with a Stand and a Standing Straight Collar. A standing straight collar (or band collar) is essentially the collar stand without the fabric folding over and the points on the collar.

The Oversized Shirt pattern from The Assembly Line
Fit of the collar
It is always worth testing the collar of a shirt before making the final piece as it is hard to make any changes after it is attached to the body of the shirt.
If you are unsure if it will fit you, do a mock up of the collar in some scrap fabric using just the collar stand and the collar pattern pieces. This is also good practise for sewing the collar together and working through any construction kinks you may find.
If you like to wear your collar open then it is unlikely that you will need to change the size, however if you like to wear your collar done up and your trial collar too tight or loose, you can grade up or down a size.
This will just be a case of grading any pattern piece that attaches to the collar stand to the appropriate size. We always suggest that you make a toile if you are grading to ensure that it still fits well. It may take a couple of adjustments to get the right fit for you. But it will be worth the effort when you have a well fitted shirt!
Standing Straight Collar
It is really important that this part of the shirt is accurately cut and sewn. Both sides of the collar need to be symmetrical. After you have cut them out, fold both the inner and outer collar pieces in half to ensure that they are the same shape. Trim if necessary.

When sewing the curve on the collar use longer stitches, stitch slowly and let the machine do the work as you guide it around the curve. It can be helpful to mark the stitching line to follow on the fabric - this will help improve accuracy and to give it the best chance of being symmetrical. It will be very obvious if the collar isn’t symmetrical on the finished item. I used our Two Colour Pencil to mark on the stitch line.

If your stitching isn’t smooth and even and is ever so slightly wonky it will result in a little rise and fall on the seam line when you press it open.
The above photo shows the stitch line and there are a couple of stitches which dip down. This is enough to result in the bump that you can see in the collar below.

If you stitch slowly, follow the stitch line you have marked and let the machine do the work as you guide it round the curve, it will result in an even stitch and an even collar.
After you are comfortable with your stitching, trim the seam allowance with some Duckbill Scissors which are perfect for grading seams.
Topstitching
Another option is to top stitch around the edge of the collar, this will stop the seam from rolling to one side. Take the sewing slowly to ensure precision, and again, marking on the stitch line will help with your accuracy. Just ensure that any marks you make on the fabric can be removed as they will be on the exterior of the collar and visible.

After you have attached the inner collar stand to the shirt take the time to tack/baste rather than pin the under collar down. This will allow you to be more accurate when you machine sew the inner collar stand down. Pining allows for some movement when sewing, especially over some of the bulkier seams.
Traditional Collar
Follow the same steps as for the standing straight collar when cutting out and matching it up to make sure that the sides are symmetrical.
This point is mentioned in the Oversized Shirt pattern instructions, but is a really good sewing tip and I didn’t want you to miss it! When you are stitching the points on the collar instead of pivoting on the point, take one or two short stitches across each corner. This provides strength at the tip of the collar.

When turning the points of the collar to the right side, please resist using anything sharp. It could puncture the seam, or put a lot of strain on the point and can mean that it wears a lot quicker. Instead gently push it through and wiggle the point out with your fingers. If you do want to use something then make sure you have a rounded edge and not a sharp point - our Bamboo Point Turner is a good option. Just be very gentle and don’t put any unnecessary strain on the seam. The Point Turner is also useful for pressing and opening the seams on the edge of the collar.
Topstitching
Topstitching is a feature that can often be seen on ready to wear shirts and is an opportunity to individualise your shirt. It could be in contrasting thread to really make a feature of it or matching thread for a subtle finish. Have a look at some ready to wear shirts for some inspiration. This can be as simple as popping to a local store to have a look at the different types of shirts they have and the different finishes.
In this sample I have used a contrasting thread so that it is clearer. I have top stitched 5mm from the edge of the collar.

To ensure the best finish on topstitching, sew it on the side that you are going to see. In this case along the outer collar stand. (a lot of the inner collar stand will be covered by the collar)
Checklist for collars.
- Check your collar fits before sewing it.
- To prevent the collar twisting, cut on the straight grain. Be very accurate with your pattern placement and cutting.
- Match the centre points of the collar, the collar stand and shirt to ensure the collar is dead centre.
- Layer seams and trim to allow the collar to lie flat
- Use an interfacing of the correct weight and finish. For our samples and the finished shirt we used the Mid-heavy Weight Woven Interfacing. Always test the interfacing on your fabric to make sure it works correctly.
- Press well at every stage.
Ref: The good Housekeeping Home Dressmaking book.
________
Below are the different stages to making a shirt, if there is a particular part of the shirt making process that you are interested in then you can go straight to it!
- Sewing your own shirt - an introduction
- Review of the Oversized shirt
- Anatomy of a shirt
- Sewing Cuffs
- Plackets
- Seam Finishes
SAVE IT FOR LATER....